Magnatag InSight
The whiteboard and how it helps us brainstorm, innovate, motivate and create
RECENT BLOG POSTS
- Glass vs Porcelain vs Melamine: Which Magnetic Dry Erase Surface Lasts Longest?
- Full‑Wall Whiteboard Panels vs Paint: Performance, Cost, and Longevity Compared
- The Definitive Guide to Creating High‑Quality Branded Whiteboards with Magnatag
- Glass vs. Porcelain: Which Whiteboard Surface Fits Modern Offices Best?
- The Definitive Guide to Choosing Durable Whiteboard Walls for Modern Offices
- Why 2025 Is the Year to Upgrade Your Office Magnetic Whiteboard
CATEGORIES
Whiteboards For The Home
A collection of tips and tricks of how to use a whiteboard at home.
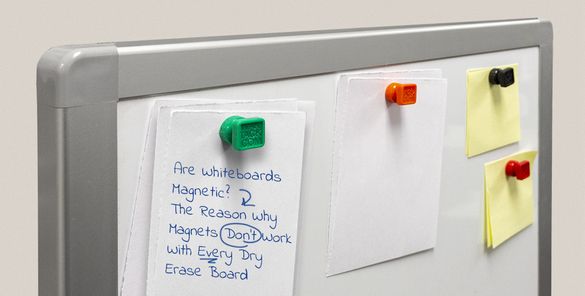
Are All Whiteboards Magnetic?
Thu Aug 29 2019By: Mike P
If you’ve spent a considerable amount of time interacting with whiteboards, you might have noticed that not every whiteboard is created equally. In fact, there are a few dry-erase surfaces that don’t possess any magnetic properties whatsoever. As bizarre as it may seem, non-magnetic whiteboards do exist for a reason, and that reason is to cut costs.
Non-magnetic whiteboards are typically manufactured using one of two primary materials: medium-density fiberboard (otherwise known as MDF), or particleboard. Both MDF and particleboard are both pressed wood products, with MDF comprising primarily of pressed wood fibers vs. particleboard’s sawdust composition. Chances are you’ve run into both materials when shopping for affordable cabinetry and out-of-the-box furniture. Neither material is going to break the bank for manufacturers, which in turn makes it the perfect solution for those that need a cost-effective dry-erase board.
The board’s actual dry-erase properties come from the melamine surface that lines the front of the pressed board. Melamine is an organic compound that, when combined with formaldehyde, forms a resin/plastic with dry-erase properties. Virtually all non-magnetic whiteboards rely on melamine for their dry-erase capabilities, and oftentimes this material is added after the wood board has already been pressed.
With that being said, there is a chance your whiteboard isn’t magnetic and also isn’t made with melamine. If that’s the case, then you’re most likely using a board made of paper and film laminate. A good indication of whether or not you have either a laminate or melamine board is whether or not your board has custom print. Melamine boards are always plain white, while paper and laminate boards can accept custom prints. Regardless of this distinction, paper and laminate boards are still assembled in a similar manner as melamine boards.
“Great to know, but that still doesn’t explain why some whiteboards aren’t magnetic!”
To explain why your whiteboard isn’t magnetic, we need to take a look at how magnetic dry-erase boards are made. Most traditional magnetic whiteboards are backed with a steel sheet to provide even magnetism across the surface of the whiteboard. Additionally, porcelain and painted-steel whiteboards have the added benefit of being fired directly onto a steel surface, making the surface itself both magnetic and erasable.
Since melamine/paper and laminate boards do not have any sort of steel backing or face, they consequently lack magnetism. So to put it simply: if your whiteboard isn’t made with a steel back or porcelain face, it’s not magnetic.
Need to find a magnetic whiteboard? Magnatag is home to the internet’s most extensive collection of magnetic dry-erase boards.
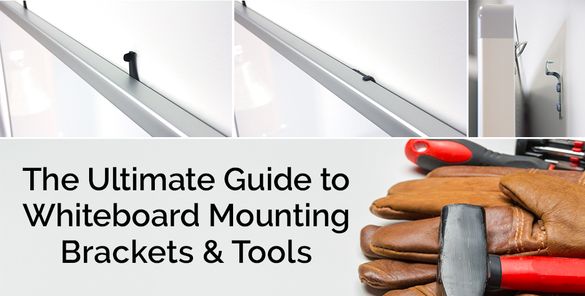
The Ultimate Guide to Whiteboard Mounting Brackets & Tools
Tue Aug 20 2019By: Mike P
While no two whiteboards are precisely the same, the same can't always be said for the equipment that keeps them hanging from the wall. Regardless of the manufacturer, many of the industry's most popular whiteboards pull from a small pool of hardware options when it comes to equipping their dry-erase boards with mounting tools. Now regardless of which mounting hardware a manufacturer chooses to use, a few tools will be standard across the board: and those are plastic wall anchors and Philips-head screws. The plastic wall anchors are great to use when you want to hang your whiteboard in an area where studs aren't available but based off our own experience, we recommend using them in all situations— with studs or without. A good general rule of thumb to go by is to use one piece of mounting hardware per horizontal feet of the markerboard in question. So, for example, an 8' x 4' whiteboard would need to have at least four pieces of hardware securing the top of the board to the wall.
But before you can even think about hardware, you need to have a proper set of tools to get the job done. In addition to what's included with your mounting hardware, we recommend having a drill, hammer, and laser level by your side—they'll be useful in just about every mounting scenario you encounter. Below we'll break down a few of the most common mounting configurations and what you'll need to get your whiteboard out of the box and onto the wall.
L-Clips
L-Clips (sometimes referred to as L-brackets or mirror mounting clips) are one of the most common pieces of hardware you'll find accompanying a standard whiteboard. L-clips are positioned at both the top and the bottom of the whiteboard and anchor directly to the wall while simultaneously hugging the outer frame. The bottom L-clips serve as a shelf for the whiteboard to sit on, with the majority of the board's support coming from the hardware at the top of the frame. For more information regarding l-clip mounting brackets, check out our step-by-step setup guide below.
Note: Before getting started with whiteboard installation, you'll need to measure where you want your whiteboard to sit. While someone holds the board mark both the bottom and top of the frame using a pen or pencil.
Z-Clips
Z-clips are primarily used for installations where the design calls for a whiteboard to hang flush to the wall. As an added bonus, mounting hardware remains hidden in all Z-clip installs since everything can be finished without screwing into the face of the panel. The brackets are generally located at the top of the whiteboard and slide into place using an interlocking hanging mechanism. You may even recognize the Z-clip hardware from Magnatag's line of VisuGlass™ Magnetic Glass Markerboards. Most markerboard manufacturers that rely on- Z-clips will ship their whiteboards the mounting hardware already attached to the back of the board. In the case that your whiteboard doesn't have clips attached, check with the manufacturer before installing anything to the back of the board. For more information on how to install a whiteboard using Z-clips, check out the guide below.
Safety Hooks
Safety hooks should be a familiar installation technique for anyone that’s been around a standard picture frame within the past decade. All you have to do is mount a pair of hooks to the wall and hang the whiteboard using the board’s attached hangers. Safety hooks are one of the easiest installs you’ll come across on your whiteboard mounting journey, and thanks to the tried and true hook and hanger design, it’s also one of the most reliable mounting methods for those living in an earthquake-friendly zone. If your whiteboard doesn’t come pre-equipped with a set of hangers, you’ll either need to purchase and install the hardware before mounting or look at other mounting options. For information on safety-hook installs, check out our step-by-step instructions below.
FrameKlamp™ Mounting Brackets
FrameKlamp is the exclusive mounting bracket from our team at Magnatag Visible Systems. Installing a whiteboard with FrameKlamp mounting brackets can be done in seconds thanks to the patented, re-adjustable, locking brackets. Much like Z-clips, FrameKlamps ensure that your whiteboard remains flush to the wall without the need for any front-facing modifications. However, what sets FrameKlamps apart from Z-clips is the hardware's added flexibility post-installation. Say you wish your whiteboard was positioned to the left or right of where you initially placed it; rather than having to remove the board entirely from the wall and reinstall the mounting hardware, FrameKlamps allow you to simply lift the locking mechanism and slide the board to your desired location. As a rule of thumb, we recommend using three FrameKlamps for boards that are 4’ x 6’ or smaller, and five for larger boards. For more information on how to install a whiteboard using FrameKlamps, check out the guide below.
Have any more questions regarding how to properly mount your whiteboard or what tools you may need? Feel free to shoot us an email at info@magnatag.com
But before you can even think about hardware, you need to have a proper set of tools to get the job done. In addition to what's included with your mounting hardware, we recommend having a drill, hammer, and laser level by your side—they'll be useful in just about every mounting scenario you encounter. Below we'll break down a few of the most common mounting configurations and what you'll need to get your whiteboard out of the box and onto the wall.
L-Clips
L-Clips (sometimes referred to as L-brackets or mirror mounting clips) are one of the most common pieces of hardware you'll find accompanying a standard whiteboard. L-clips are positioned at both the top and the bottom of the whiteboard and anchor directly to the wall while simultaneously hugging the outer frame. The bottom L-clips serve as a shelf for the whiteboard to sit on, with the majority of the board's support coming from the hardware at the top of the frame. For more information regarding l-clip mounting brackets, check out our step-by-step setup guide below.
Note: Before getting started with whiteboard installation, you'll need to measure where you want your whiteboard to sit. While someone holds the board mark both the bottom and top of the frame using a pen or pencil.
- Align the brackets so that the bend in the clip is resting along the laser sight and mark your anchor point using the clip's alignment slots (for the bottom clips, the longer edge of the clip should point up and vice versa for the top clips.)
- Using a 1" drill bit, drill one hole per every alignment mark from step 1.
- Lightly hammer the plastic wall anchors into the pre-drilled holes.
- Using a screwdriver or drill, attach the L-clips to the wall using the anchor points you installed in step 3.
- Slide the whiteboard into place to ensure it fits snugly within the top and bottom rows of hardware.
- Using a drill, screw the top and bottom clips into the frame using self-tapping screws.
Z-Clips
Z-clips are primarily used for installations where the design calls for a whiteboard to hang flush to the wall. As an added bonus, mounting hardware remains hidden in all Z-clip installs since everything can be finished without screwing into the face of the panel. The brackets are generally located at the top of the whiteboard and slide into place using an interlocking hanging mechanism. You may even recognize the Z-clip hardware from Magnatag's line of VisuGlass™ Magnetic Glass Markerboards. Most markerboard manufacturers that rely on- Z-clips will ship their whiteboards the mounting hardware already attached to the back of the board. In the case that your whiteboard doesn't have clips attached, check with the manufacturer before installing anything to the back of the board. For more information on how to install a whiteboard using Z-clips, check out the guide below.
- Locate and mark wall studs (or install wall anchors if necessary)
- Mark wall at the desired top edge of glass board
- Mark studs 1-5/8" below top edge mark for Z-clips
- Confirm that your wall markings are level
- Using a Drill, fasten Z-clips to the marked wall studs using hardware appropriate for your wall type
- With the help of one or two others, lift board and engage the top edge of the board hardware into the wall brackets.
- Gently lower board to wall and affirm that the wall-mounted z-clips are correctly engaged with the back of the board.
Safety Hooks
Safety hooks should be a familiar installation technique for anyone that’s been around a standard picture frame within the past decade. All you have to do is mount a pair of hooks to the wall and hang the whiteboard using the board’s attached hangers. Safety hooks are one of the easiest installs you’ll come across on your whiteboard mounting journey, and thanks to the tried and true hook and hanger design, it’s also one of the most reliable mounting methods for those living in an earthquake-friendly zone. If your whiteboard doesn’t come pre-equipped with a set of hangers, you’ll either need to purchase and install the hardware before mounting or look at other mounting options. For information on safety-hook installs, check out our step-by-step instructions below.
- Measure the spacing of the board hangers on the back of the board (standard 16" on center spacing). Mark wall at desired height and measured hanger spacing.
- Fasten the safety hooks to the wall using selected fasteners.
- Engage the pre-installed hangers on the back of the board securely onto the safety hooks.
FrameKlamp™ Mounting Brackets
FrameKlamp is the exclusive mounting bracket from our team at Magnatag Visible Systems. Installing a whiteboard with FrameKlamp mounting brackets can be done in seconds thanks to the patented, re-adjustable, locking brackets. Much like Z-clips, FrameKlamps ensure that your whiteboard remains flush to the wall without the need for any front-facing modifications. However, what sets FrameKlamps apart from Z-clips is the hardware's added flexibility post-installation. Say you wish your whiteboard was positioned to the left or right of where you initially placed it; rather than having to remove the board entirely from the wall and reinstall the mounting hardware, FrameKlamps allow you to simply lift the locking mechanism and slide the board to your desired location. As a rule of thumb, we recommend using three FrameKlamps for boards that are 4’ x 6’ or smaller, and five for larger boards. For more information on how to install a whiteboard using FrameKlamps, check out the guide below.
- Using a level, mark wall at desired height for top edge of your board and at appropriate wall stud locations for FrameKlamps.
- Fasten FrameKlamps at marked locations using screws appropriate for your wall type.
- With FrameKlamps in vertical (unlocked) position, install board over FrameKlamps.
- Slide board left or right, if necessary, for best location, then pivot FrameKlamps into locked position.
Have any more questions regarding how to properly mount your whiteboard or what tools you may need? Feel free to shoot us an email at info@magnatag.com

Why isopropyl Alcohol is Dangerous For Your Dry Erase Board
Wed Nov 29 2017By: Mike P
If you do a bit of research on the best ways to clean a whiteboard, chances are the first recommendation you’ll find contains alcohol at the top of the list. There’s a common misconception out there that it’s okay to clean your whiteboard with rubbing alcohol; we’re here to tell you that is not entirely true. We’ll be the first to admit that isopropyl alcohol works as a tremendous cleaning agent, but when it comes to maintaining the quality of your dry erase board, it’s the worst solution imaginable.
